Beginner’s guide: macrame cord projects for home décor
Why Macramé Cord Projects For Home Décor Are A Game‑Changer
Hey lovely soul, ready to get crafty? So you’re curious about macramé cord projects for home décor — and you’re in the right place. I remember when I first picked up that soft cotton cord, sat down with a cuppa, and thought: Can I really turn this into something beautiful for my living room? It made me feel excited, a little nervous, and totally hooked all at once.
Well, here’s the thing — macramé isn’t just a trendy craft. It’s a fun, tactile, creative way to bring cozy, boho‑chic texture into your space. And yes, you can absolutely do it even if you’ve never tied a knot in your life. In this beginner’s guide to macramé cord projects for home décor (yep — there’s your main keyword), we’ll walk together through what materials you need, the essential knots, the best projects to start with, and how to turn that little hobby into décor that says you.
By the end of this read, you’ll feel something like: “Wow — I got this.” You’ll have ideas buzzing, hands itching to try a project, and the confidence to craft something you’ll proudly hang, use, or gift. Ready? Let’s dive in and get knotty (in the best way possible)!
Understanding Macramé Cord And Why It Matters
What is macramé cord?
Okay, so let’s start with the basics. Macramé cord is simply a thick, strong string made especially for knotting. It’s the backbone of your craft. When you pick up the right cord, you’ll feel the difference: the texture, the weight, how the knots behave. When I first felt that smooth cotton cord in my hand, I thought: “This is going to become art.”
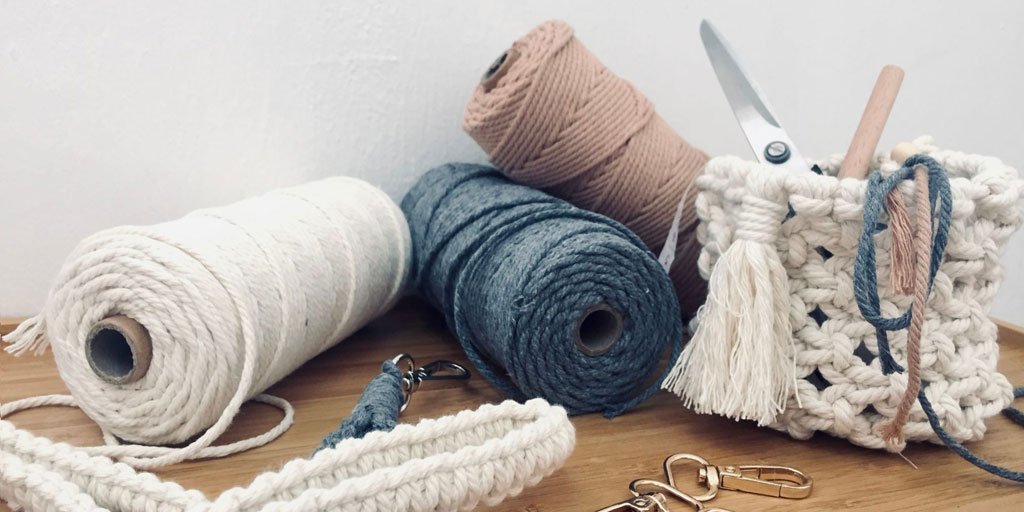
Types of cord (cotton, jute, synthetic) and sizes
You’ve got options — which is awesome but also means you’ll want to make a good choice.
Some common types:
- Cotton cord: Soft, easy to handle, great for indoor décor like wall hangings or plant hangers.
- Jute or hemp: More rustic, thicker, good for earthy textures or outdoor pieces.
- Synthetic (polypropylene, nylon): Strong and weather‑resistant — ideal for outdoor, or for something that needs durability.
You’ll also see cords described by thickness: 3 mm, 5 mm, even 8 mm. Thicker cord gives bold, chunky knots; thinner gives delicate, refined detail.
One Redditor noted their choice:
“I have only worked with 5 mm & 3 mm single strand cotton cord and I love it for making indoor plant hangers …”
So weigh what your project is, what your space is like, and how you want it to look.
How cord choice affects texture, look and durability
Choosing the right cord is basically choosing your outcome. Want modern, sleek, minimalist? Pick a thinner, neutral‑coloured cotton cord. Want bold boho? Go thicker, maybe natural jute. Want outdoor resilience? Synthetic. The cord will determine:
- How your knots sit
- How your piece hangs and drapes
- How much wear it’ll take (dust, sun, pets)
It made me feel even more excited when I realized that the cord wasn’t just a “material” but actually part of the design.
Essential Knots Every Beginner Should Master
Here are the knot types you’ll revisit again and again. Master these and you’ve got the foundation.
Lark’s Head Knot
This is your go‑to for starting a piece. Attach cords to a dowel, ring or stick. Super handy.
A tutorial explains: fold your cord in half, loop over your support, pull ends through and tighten. It may feel tiny at first, but this knot sets the tone.
Square Knot & Variations
The square knot is like an old friend in macramé. It looks clean and works in lots of projects. To make: use four cords (two center, two working), cross left over center, right over that, then reverse. Boom — square knot. Variations like alternating square knots give you diamond patterns.
Double Half Hitch & Spiral Knot
Want lines, angles, textures? The double half hitch knot creates those smooth lines diagonally or horizontally. The spiral knot (basically repeating half‑square knots on the same side) gives that twisty coil look.
Gathering Knot and Finishing Techniques
When you’re wrapping up a project — like at the bottom of a plant hanger or finishing off a wall hanging — the gathering knot is your friend. Wrap a long cord around a bundle, loop through, trim. Nice clean finish. Also brushing out ends, trimming fringe, all that adds polish.
When you feel comfortable tying these knots, you’ll get this little sparkle of satisfaction — there’s nothing like seeing your pattern come alive.
Setting Up Your Workspace And Tools
Let’s make this fun and comfy. Crafting should feel relaxing, not stressful.
What tools & accessories you’ll need
Here’s a quick list:
- Macramé cord (your choice of size and material)
- Scissors (sharp!)
- Measuring tape or ruler
- Dowel, wooden branch, ring or metal hoop (to hang your work)
- Optional: beads, wooden rings, feathers, comb for fringe
- A clip board or a hook to keep your work in place while you knot
Setting these up means you’re ready to go. No rummaging halfway through.
Choosing a support bar, ring or dowel
Your piece needs a foundation. A wooden dowel is classic. You could use a driftwood branch for rustic charm. For plant hangers, a metal ring works. The size matters: if you do a wall hanging 60 cm wide, choose a support that fits. If you pick a huge dowel for a small project, it can feel unbalanced. One site recommends a wooden dowel for beginner wall hangings.
Workspace tips for tension, organization & comfort
Here are some friendly pointers:
- Hang your support at eye‑level if possible — it helps with tension and knotting.
- Keep your cords organized so you don’t get tangled (ask me how I know!).
- Use good lighting — knots look clearer under bright light.
- Play your favourite music or podcast — you’re crafting, after all.
- Every now and then stretch your hands and wrists (knotting can be surprisingly heavy).
When you set up well, the making process becomes peaceful and joyful rather than frustrating.
Easy Macramé Cord Projects For Home Décor
Now we get to the fun part — actual projects you can look at and say, “Yep, I can do that!”
Wall Hanging – a first big piece
This is the iconic macramé project. You hang it on the wall, it adds texture, personality. A tutorial suggests starting with cutting several cords, attaching to a dowel, then working square knots and finishing with a fringe.
Why it’s perfect for beginners: You’ll practice your knots, you’ll see big results, and you’ll have a piece that actually lives in your home.
Plant Hanger – bring greenery into your space
If you love plants (and who doesn’t after all?), a plant hanger made with macramé cords is a beautiful option. Use a ring or dowel, attach cords, weave your knots, and cradle your pot. A beginner piece in one tutorial: cut four strands of cord ~3 meters each, attach to brass ring, knot into a cradle.
It fills me with joy to see a plant swinging gently in a handmade hanger.
Coasters and Small Accents – quick wins
Want something fast? Macramé coasters, keychains or bag charms are ideal. Just a few feet of cord can give you meaningful décor pieces.
Example: one forum lists coasters with a few feet of cord and basic square knot design.
It’s super satisfying when you finish a coaster in an afternoon and use it the next day.
Basket or Bowl – textured functional décor
If you’re ready to step it up, try a macramé basket. Using thicker cord or combining knots and perhaps a wooden base, this piece is both decorative and functional. One blog mentions baskets made with macramé cord lending stylish look in corners or on balconies.
When you sit back and place something in that basket you made… that feeling is something special.
Curtain or Room Divider – step‑up challenge
Want to make a statement? A full macramé curtain or room divider uses lots of cord and some advanced knot patterns. According to one resource, a door curtain project can require around 15‑20 feet of cord per strand.
Yes, it takes more time and patience, but imagine walking into your room and seeing that handmade texture dancing in the light.
Step‑by‑Step: How to Create A Simple Wall Hanging
Let’s walk through one project together so you feel ready to jump in.
Measuring cord & cutting lengths
- Decide your width (e.g., 40 cm dowel).
- Choose cord thickness (say 5 mm cotton).
- Cut cords: for example, eight cords of 3 m each (you’ll fold them in half, giving 16 working ends). Better to cut a little extra — you’ll trim later. One tutorial says “cut eight strands of macramé cord, each 5 meters long” for larger wall hangings.
- Label if needed so you don’t mix lengths.
Attaching to dowel with Lark’s Head
- Take each cord, fold in half, loop over dowel and pull ends through loop (that’s the Lark’s Head).
- Space your cords evenly along the dowel.
This step is like laying the foundation of your creation — get it right and you’ll feel confident.
Transitioning into square knot rows
- Decide on your knot pattern. Start with square knots: group cords in fours, tie square knot.
- For visual interest, you might do alternating square knot rows (diamond shape) or a spiral knot column. Tutorials say alternating knots create wide panels.
- Keep your tension even — not too loose (floppy) and not too tight (distorted).
- Work down the cords until you reach your desired length.
Finishing the fringe and presentation
- Once your knotting is done, gather the cord ends and decide how you’ll finish: trimmed straight, V‑shape, or frayed.
- Use a comb to brush out the fringe if you want softness.
- Hang your piece on the wall — use picture hooks or nails suitable for your wall surface. Stand back. That moment when you see it hanging? It’s magic.
You made this. You created texture and shape out of raw cord.
Choosing Projects Based on Your Space & Style
Match cord colour and thickness to room décor
Look at your space: is it light and airy? Then choose soft cotton, neutral tones. Bold colored accent? Go brighter. Thick cord gives a heavy statement piece; thin cord subtle elegance. One beginner article suggested choosing cord colors you love, mixing two if you’re feeling adventurous.
Scale & size considerations for different rooms
In a small room, a huge wall hanging may overwhelm. In a big room or loft, small coasters might feel lost. For example, a full room divider makes sense in a large, open area. A plant hanger fits a corner. One list of project sizes shows tissue box cover (~10‑15 feet cord) and swing chair (~100‑150 feet cord) as very different scales.
Mixing textures, beads and embellishments
You can totally elevate your project by adding wooden beads, metal rings, natural feathers, or mixing two cord types. These touches make your piece uniquely yours. Tutorials show how to add fringes and embellishments.
These little choices are where your personality shows up — and that, my friend, is where the magic happens.
Troubleshooting Common Beginner Mistakes
Don’t worry — even seasoned makers trip occasionally. Here are common issues and how you fix them.
Uneven tension or twisted cords
If one side looks tighter than the other, knots will sit unevenly. The fix: check after every few knots, remove the piece, rotate it and even out lengths. Also ensure cords aren’t twisted before you tie.
Wrong cord size for the project
Using a 3 mm cord when you need bold texture? It may disappear. Using a huge 10 mm cord for a small plant hanger? It might overwhelm the pot. Choose according to scale and piece. One Redditor recommends 3–5 mm for indoor plant hangers.
Finishing too early or forgetting measuring allowance
“Better cut more than you need” is a motto for macramé cord. I learned the hard way when I cut too short and had to restart.
One beginner forum:
“I started out from a beginner coaster kit … then realised the cord wasn’t long enough.”
So always add extra length — you’ll thank yourself.
Maintaining and cleaning your macramé pieces
Once your piece hangs, dust will collect (especially if in a living room or plant area). Use a soft brush or vacuum with a gentle brush head. For outdoor cords or thicker ones, synthetic cords may require a mild rinse (let dry fully). If you used cotton and it gets damp (say near a plant), make sure it dries to prevent mildew.
When you look back at your first project and see how much you’ve improved — that feeling is rewarding.
Advanced Tips To Grow Your Skills
If you’re ready to go beyond “easy”, here are ways to level up.
Combining knots for custom patterns
Once you’ve mastered the basics, start mixing: a row of square knots, then a series of double half hitch knots, then a spiral. Tutorials show patterns with diagonal lines, diamond shapes.
Try replicating a design you love then tweak it — change the color, the spacing, the fringe.
Incorporating wooden beads, feathers, metal rings
Adding embellishments elevates your work. For example, use a metal ring as starting point for a plant hanger, or thread wooden beads into your cords for texture. One article mentions using colourful cords and beads for small accent projects.
These touches feel so personal — it fills me with joy when I add a little bead and think “Yep, that’s exactly me.”
Designing your own project from scratch
Want to design something completely your own? Sketch your idea: width, length, cord type, knots you’ll use. Then calculate cord lengths (including extra). Choose your support. Create a diagram or map. The Reddit macramé community suggests learning through experimentation.
This is where you move from “following a pattern” to “creating a pattern” — and it’s thrilling.
Sustainability and choosing eco‑friendly cords
If you’re conscious about materials (and who isn’t these days?), look for organic cotton cords, recycled blends, or natural fibres. One tutorial highlighted “Katia Soft Macramé… a sustainable macramé cord composed of 50 % organic cotton and 50 % recycled cotton.”
Not only will you have a beautiful piece — you’ll have one you feel good about. That’s a double win.
Weaving Your Way to a Cozy, Personalized Home: Final Thoughts on Macramé Cord Projects
Phew — we’ve traveled a lot together through the world of macramé cord projects for home décor. From picking the right cord, mastering knots, setting up your space, creating easy projects, choosing styles, troubleshooting mistakes, and growing beyond beginner — you’ve got the blueprint now. It made me feel hopeful and excited writing this, because I know that once you pick up the cord and start knotting, you’ll feel that same buzz.
So here’s the bottom line: you can absolutely bring handmade texture, warmth, and personality into your home with macramé. It doesn’t have to be complicated. It doesn’t have to be perfect. It just needs you, a cord, and a bit of curiosity. Start simple, enjoy the process, let your hands learn, and before long you’ll have décor pieces you made — and that’s special.
When you look at your wall hanging, your plant hanger, your basket — and you think, I made this — that feeling? That’s what makes it all worth it. So give yourself permission to play, experiment, and create. Your home is going to thank you.
Please read more about the best macrame cord.
FAQs
What type of cord should I buy for a beginner macramé project?
For most beginners, a 4‑5 mm cotton cord works beautifully. It’s easy to handle, knots nicely, and gives good texture. If you’re doing something large or outdoor, you might choose thicker or synthetic cord.
How long should the cord be when I start a project?
It depends on the project, but always cut more than you think you need.
For example: for a wall hanging maybe eight strands of 3 m each (folded). If you’re doing something larger, lengths can go to 5 m or more. One tutorial advised cutting eight strands of 5 m for bigger pieces.
Do I need to purchase expensive tools to get started?
Not at all! The basic tools are a good pair of scissors, measuring tape, and something to hang your project on (dowel, branch, ring). Many beginner resources say just cord and support bar are enough.
What if my knots look uneven or my cord is twisting?
That’s totally normal. The fix: slow down, check that cords aren’t twisted before knotting, keep consistent tension, and periodically step back to review your work. If needed, undo a few rows and re‑set them. It’s part of learning.
Can macramé pieces be cleaned, and how do I maintain them?
Yes! For indoor cotton pieces, dust occasionally with a soft brush or vacuum on low with brush head. If cords get damp, make sure they dry fully. Outdoor or heavier pieces (synthetic cord) might be rinsed gently (without harsh detergent) and hung out to dry.